React Demystified
To use react, you’d just need to port in a couple of necessary script tags into a standard html file to begin:
<html lang="en">
<head>
  <meta charset="UTF-8">
  <meta name="viewport" content="width=device-width, initial-scale=1.0">
  <meta http-equiv="X-UA-Compatible" content="ie=edge">
  <link rel="stylesheet" href="./style.css">
  <title>Adopt Me</title>
</head>
<body>
  <div id="root">not rendered</div>
  <script src="https://unpkg.com/react@18.2.0/umd/react.development.js"></script>
  <script src="https://unpkg.com/react-dom@18.2.0/umd/react-dom.development.js"></script>
  <script>
    // Your code is going to go here
  </script>
</body>
</html>
We need a root div and we are ready to hook in and create some elements. In the last script tag, we can add the following to get started with an App:
const App = () => {
  return React.createElement(
    'div',
    {},
    React.createElement('h1', {}, 'My Custom React App!')
  );
};

const container = document.getElementById('root');
const root = ReactDOM.createRoot(container);
root.render(React.createElement(App));- React is all about making components. And then taking those components and making more components out of those.
- There are two types of components, function components and class components. This is a function component. We’ll see class components shortly.
- A function component must return markup (which is what
React.createElementgenerates.) - These component render functions have to be fast. This function is going to be called a lot. It’s a hot code path.
- Inside of the render function, you cannot modify any sort of state. Put in functional terms, this function must be pure. You don’t know how or when the function will be called so it can’t modify any ambient state.
React.createElementcreates one instance of some component. If you pass it a string, it will create a DOM tag with that as the string. We usedh1anddiv, those tags are output to the DOM. If we putx-custom-date-picker, it’ll output that (so web components are possible too.)- The second empty object (you can put
nulltoo) is attributes we’re passing to the tag or component. Whatever we put in this will be output to the element (like id or style.) - First we’re using
document.getElementByIdto grab an existing div out of the HTML document. Then we take that element (which we calledcontainer) and pass that intoReactDOM.createRoot. This is how we signal to React where we want it to render our app. Note later we canroot.renderagain to change what the root of our React app looks like (I rarely need to do that.) - Notice we’re using
React.createElementwithAppas a parameter toroot.render. We need an instance ofAppto render out.Appis a class of components and we need to render one instance of a class. That’s whatReact.createElementdoes: it makes an instance of a class. An analogy is thatAppas a class of components is like Honda has a line of cars called Civics.
It’s a whole line of cars with various different options and parameters. An instance of a Civic would be one individual car. It’s a concrete instance of the Civic car line.
ReactDOM.createRoot is a new API as of React v18. The old
ReactDOM.renderis still available (and deprecated) but it’ll render your app in “legacy” mode which won’t use all the fun new features packed into React v18
We can have re-usable functional components as such, one for Pet animals:
const Pet = (props) => {
  return React.createElement('div', {}, [
    React.createElement('h1', {}, props.name),
    React.createElement('h2', {}, props.animal),
    React.createElement('h2', {}, props.breed),
  ]);
};

const App = () => {
  return React.createElement('div', {}, [
    React.createElement('h1', {}, 'Adopt Me!'),
    React.createElement(Pet, {
      name: 'Luna',
      animal: 'Dog',
      breed: 'Havanese',
    }),
    React.createElement(Pet, {
      name: 'Pepper',
      animal: 'Bird',
      breed: 'Cockatiel',
    }),
    React.createElement(Pet, { name: 'Doink', animal: 'Cat', breed: 'Mix' }),
  ]);
};

const container = document.getElementById('root');
const root = ReactDOM.createRoot(container);
root.render(React.createElement(App));
However, we are now used to writing more read-able and maintainable ECMAScript module components
const Pet = (props) => {
  return (
    <div>
      <h1>{props.name}</h1>
      <h2>{props.animal}</h2>
      <h2>{props.breed}</h2>
    </div>
  );
};

export default Pet;
Difference b/w default export vs named export is how you import it — default makes it a top-level export, and named is named 😅
import Pet from './Pet'; // default export
// vs
import { Pet } from './Pet';
Core Concepts
- What is JSX?
JSX is just translating those HTML tags into
React.createElementcalls. That’s it. Really. No more magic here. JSX does nothing else. Many people who learn React don’t learn this. - Every time an event happens, React re-renders everything top-to-bottom
- What are hooks?
A hook called such (in my head) because it’s a hook that gets caught every time the render function gets called. Because the hooks get
called in the same order every single time, they’ll always point to the same piece of state. Because of that they can be stateful: you
can keep pieces of mutable state using hooks and then modify them later using their provided updater functions. - An absolutely key
concept is hooks rely on this strict ordering. As such, do not put hooks inside if statements or loops. If you do, you’ll have
insane bugs that involve
useStatereturning the wrong state. If you seeuseStatereturning the wrong piece of state, this is likely what you did. - Because the previous point is so absolutely critical, the React team has provided us with a lint rule that help us not fall into that trap. That lint rule relies on us, the developers, to follow the convention of calling our hooksuseXxxxxx. If you’re willing to do that, the lint rules will guard you from calling the hooks out of order. - We are able to useconstfor something likeconst [route, setRoute] = useState("")because the values are not changing until the entire function under which this state hook resides (component function) is re-run. We can also useletit’s a stylistic choice here. <StrictMode>just helps you adhere to new features that the React team is working on and adhere/update existing features that will be deprecated in newer versions. NOTE: it makes all requests twice (so you will see duplicate requests in dev mode)- If using Vite or Parcel as a bundler, you’re good, but if you’re using web-pack, ensure you set
NODE_ENVtodevelopmentduring dev work, andproductionfor prod bundles. Slack famously shipped the dev version of their electron app forever, and that wasn’t the most performant version being shipped! - Props are read-only, state is mutable
- Don’t make complex, elegant re-usable code for 1 time use. Instead write it twice if need be, but think about abstracting on the third time!
Hooks
Just like useState is a hook, there are a few others like useEffect (which we’ll use in this lesson), useReducer (for doing Redux-like reducers),
useRefs (for when you need to have programmatic access to a DOM node), and useContext (for using React’s context which we’ll do shortly as well).
But like React hooks, we can use these hooks to make our re-usable hooks.
Let’s say we need a list of breeds based on which animal is selected. In general this would be nice to request once and if a user returns later to the same animal, that we would have some cache of that.
import { useState, useEffect } from 'react';

const localCache = {};

export default function useBreedList(animal) {
  const [breedList, setBreedList] = useState([]);
  const [status, setStatus] = useState('unloaded');

  useEffect(() => {
    if (!animal) {
      setBreedList([]);
    } else if (localCache[animal]) {
      setBreedList(localCache[animal]);
    } else {
      requestBreedList();
    }

    async function requestBreedList() {
      setBreedList([]);
      setStatus('loading');
      const res = await fetch(
        `http://pets-v2.dev-apis.com/breeds?animal=${animal}`
      );
      const json = await res.json();
      localCache[animal] = json.breeds || [];
      setBreedList(localCache[animal]);
      setStatus('loaded');
    }
  }, [animal]);

  return [breedList, status];
}
It’s a personal choice where you put things. You can put all this in the component directly, but it’s advisable to have custom hooks to encapsulate all the lines and keep things terse for the component file.
Tip: if you have custom hook that you have to wait on for a duration to complete, it’s wise to add a status (loading) state so writing tests becomes simpler
(e)⇒ is a React DOM Event, fake one, not a real one, just a synthetic one for typescript + development
Component Structure
Pull things out when you notice that it could be its own component — individually testable, usable, if a component is getting too big.
React Router
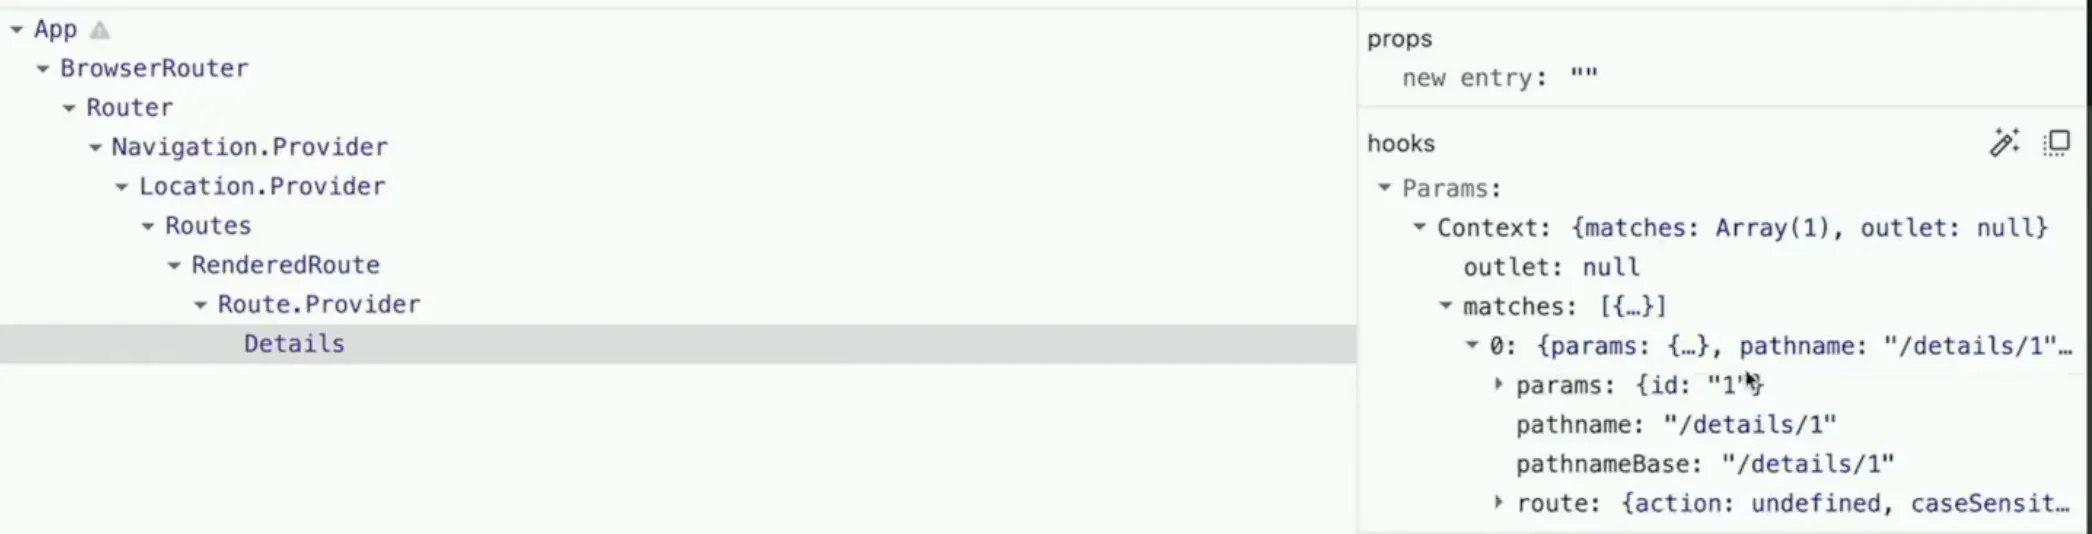
BrowserRouter is a context that wraps around our entire app. useParams() hook is used to access a separate store that keeps track of particular routes, their ids, etc.
The state tree is visible in React DevTools, where there’s pattern matching for the particular routes for the Details page, in this case:
Class Components
Used to be a thing, still is a thing depending on certain situations/use-cases, but won’t be diving into this further than just providing an example of a Carousel class component below:
import { Component } from 'react';

class Carousel extends Component {
  state = {
    active: 0,
  };

  static defaultProps = {
    images: ['http://pets-images.dev-apis.com/pets/none.jpg'],
  };

  render() {
    const { active } = this.state;
    const { images } = this.props;
    return (
      <div className='carousel'>
        <img src={images[active]} alt='animal' />
        <div className='carousel-smaller'>
          {images.map((photo, index) => (
            // eslint-disable-next-line
            <img
              key={photo}
              src={photo}
              className={index === active ? 'active' : ''}
              alt='animal thumbnail'
            />
          ))}
        </div>
      </div>
    );
  }
}

export default Carousel;- Every class component extends
React.Component. Every class component must have a render method that returns some sort of JSX / markup / call toReact.createElement. - We used to have a
constructorfunction to set initial state. Now with class properties we can skip that. - Notice instead of getting props via parameters and state via
useStatewe’re getting it from the instance variablesthis.stateandthis.props. This is how it works with class components. Neither one will you mutate directly.this.stateis the mutable state of the component (like useState). You’ll usethis.setStateto mutate it (don’t modify it directly.)this.propscomes from the parent component, similar to parameter given to the render functions that we pull props out of.
- We also set
defaultPropsin the case that someone uses this component without providing it with props. This allows us to always assume that the photos prop is going to be an array instead of having to do a bunch of “if this thing exists” logic
Note:
ErrorBoundaryis written as a class component for React even currently, despite everything else possible being written in a functional style
class ErrorBoundary extends Component {
  state = { hasError: false };
  // static method in the class
  // that is required by the EB
  static getDerivedStateFromError() {
    return { hasError: true };
  }

  // another method that is part of this class
  // hence we need to use the class component
  componentDidCatch(error, info) {
    // we are console loggin, but we can ship things off to
    // sentry, newrelic, trackjs etc. some aggregation error tracking software as a service
    console.error('ErrorBoundary component caught an error', error, info);
  }

  render() {
    // clean way to handle errors across the site
    if (this.state.hasError) {
      return (
        <h2>
          There was an error with this listing.{' '}
          <Link to='/'>Click here to go back to the home page.</Link>
        </h2>
      );
    }

    // otherwise render items without intereference
    return this.props.children;
  }
}

export default ErrorBoundary;

// usage for a component called Details.jsx in said file
// ...

function DetailsErrorBoundary(props) {
  return (
    <ErrorBoundary>
      <Details {...props} />
    </ErrorBoundary>
  );
}

export default DetailsErrorBoundary;
Lifecycle methods
Class components have lifecycle methods. These for the most part are what useEffect does for function components.
They’re for doing things like making API calls, starting and ending transitions/animations, debugging, and other things like that.
The most common ones are:
constructorisn’t necessarily a React lifecycle method but we use it like one. It’s where you do things that need to happen before the first render. Generally it’s where you set the initial state.componentDidMountis a function that’s called after the first rendering is completed. This pretty similar to auseEffectcall that only calls the first time. This is typically where you want to do data fetching. It doesn’t have to be async; we just made it async here to make the data fetching easy.componentDidUpdateis called after your state is updated. If you’re doing something like Typeahead where you’re making reactive requests to an API based on user input, this would be an ideal place to do it.componentWillUnmountis typically a place for cleanup. Let’s say you had to write a component to integrate with jQuery (I’ve had to write this, multiple times), this is where you’d clean up those references (like un-attaching from DOM nodes and deleting them) so you don’t leak memory. This method is invoked whenever a component is about to be destroyed.
React Query
The hardest part about React, is useEffect, the most bugs you’ll see are to do with this particular hook (when do things fire, when do things cascade away).
However, React Query is something that abstracts fidgeting with these hooks away, and creates an avenue to write maintainable code.
The most common bug with useEffect is known as the “stale closure”. Which is when you want to set some state (update), but need to pass the current value for the state via a function
useEffect(() => {
  if (running) {
    const timer = setInterval(() => {
      setSeconds((seconds) => seconds + 0.1); // curr value of seconds
      // must be passed, or else we will get 0.1 repeatedly
      // this is because initially the value is 0, and the closure will
      // get run when the entire effect fires again, at which point it would
      // still capture the 0 inside the closure, and just add 0.1 to it.
    }, 100);
    return () => clearInterval(timer); // cleanup function
  }
}, [running]);
Remove effects that interact with the DB, React Query handles all API requests for you, we can replace the custom hook we wrote with this tool.
Minimize effects in your code, if there’s a library that can handle it for you, use it.
Steps:
-
Create a client — you can have separate clients/caches per feature
const queryClient = new QueryClient({ defaultOptions: { queries: { staleTime: 1000 * 60 * 10, // custom time in ms, this is 10 mins cacheTime: Infinity, }, }, }); -
Wrap your app with the
QueryClientProviderfor the context to initialize<BrowserRouter> <QueryClientProvider client={queryClient}> <header>...</header> <Routes>...</Routes> </QueryClientProvider> </BrowserRouter>In this case,
BrowserRouterandQueryClientProviderare Higher order Components -
Set up an API fetch in a separate file, fetchPets.js
const fetchPet = async ({ queryKey }) => {
  const id = queryKey[1];
  const apiRes = await fetch(`http://pets-v2.dev-apis.com/pets?id=${id}`);

  if (!apiRes.ok) {
    // this is exposed from react query
    throw new Error(`details/${id} fetch not ok`);
  }

  return apiRes.json(); // no need to await the res.json()
  // if you use return await apiRes.json(), it adds a tick to node server
  // it's like a few ms extra laterncy, so we can simply leave it out
};

export default fetchPet;
React Query makes these individual async parts of your code testable.
The last step, is to utilize this fetcher directly within our Details component:
import { useParams } from 'react-router-dom';
import { useQuery } from '@tanstack/react-query';
import fetchPet from './fetchPet';

const Details = () => {
  const { id } = useParams(); // from react-router
  const results = useQuery(['details', id], fetchPet); // from react-query
  // the ID we pass in here is the same one from the router param
  // "details" refers to the caching key for this fetch result
  // fetchPet function is provided if there's a cache miss for a particular id

  if (results.isLoading) {
    // we get a loading state out of the box
    return (
      <div className='loading-pane'>
        <h2 className='loader'>🌀</h2>
      </div>
    );
  }

  const pet = results.data.pets[0];

  return (
    <div className='details'>
      <div>
        <h1>{pet.name}</h1>
        <h2>{`${pet.animal} — ${pet.breed} — ${pet.city}, ${pet.state}`}</h2>
        <button>Adopt {pet.name}</button>
        <p>{pet.description}</p>
      </div>
    </div>
  );
};

export default Details;
Abstraction is good, but can quickly become your enemy when attempting to write good, maintainable code — better to write things in a few passes and then optimze/abstract later if necessary
Now we can finally update our customHook to use this fetcher
import { useQuery } from '@tanstack/react-query';
import fetchBreedList from './fetchBreedList';

export default function useBreedList(animal) {
  const results = useQuery(['breeds', animal], fetchBreedList);

  return [results?.data?.breeds ?? [], results.status];
}
You can set caches up for a query by query basis.
Mutations
POSTs or PUTs to an API
Instead of useQuery we will use useMutation which works quite similarly, but we can refer to the docs for more specific usage